Update 2/18/2014:
As it turns out the logic I used in my test below has an issue due to using setTimeout to test whether the user’s browser had loaded the GA script successfully. Phil Pearce commented and suggested following Andre Scholten’s method which avoids the use of setTimeout. I’m happy to report that follow up tests indicated less than .5% (yes, 1/2 percent) of users failed to load the DoubleClick version of the Google Analytics script. If you’ve updated your privacy policy and you’re ready to see some juicy demographic data about your users, I say go for it!
You’re about to lose visitor data.
That’s right, making the switch to the DoubleClick version (stats.g.doubleclick.net/dc.js) from the Google Analytics script (google-analytics.com/ga.js) will lead to lost data. Why? Ad blockers. Reports of data lost range from 5% to as much as 22%. In my own tests, I found that 6.87% of users that were able to load the google-analytics.com version of the script blocked the doubleclick.net version of the script. In other words, if I make the switch to the DoubleClick version of the Google Analytics script, my visits will drop by about 6.87%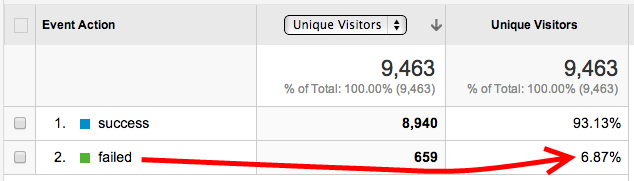
OK, then why would I switch to the DoubleClick version?
Enabling the DoubleClick version of the Google Analytics script, allows you to see demographic data about users visiting your site. This includes age, gender, as well as affinity categories (think music lovers, cooking enthusiasts, etc.). This data can then be used to improve your own display advertising efforts and also remarket more effectively. For the full rundown on these features, check out the official post from Google Analytics on reconnecting with your users.
How the heck is Google doing this?
When you visit sites that serve DoubleClick display advertising, a 3rd party cookie is dropped in the ‘doubleclick.net’ domain which follows you around from site to site. DoubleClick can now build a profile about you based on sites you frequent and the ads you interact with. When visitors come to your Google Analytics tagged site, Google Analytics drops a first party cookie that can only be read by your site (cookie dropped in ‘yoursite.com’).
Now for the fun part. Before the change, Google Analytics was executing the script from google-analytics.com which meant it couldn’t ‘see’ that 3rd party doubleclick.net cookie. When you make the switch to the DoubleClick version of the Google Analytics script, now Google can match the 1st party cookie from your site with the 3rd party cookie from DoubleClick and see the complete picture of what users did before they came to your site and what they did while they were on your site. This, of course, opens the door for very effective remarketing which makes you (and Google) more money.
How can I find out how many users I’ll lose sight of?
I was hoping you would ask. Fortunately, if you have Google Tag Manager, this test is quite easy. First I need to lay out a few assumptions:
- You’ve implemented Google Tag Manager
- You’re firing Google Analytics exclusively via Google Tag Manager
- You’ve enabled a data layer for Google Tag Manager
What we’re going to do now is add a Custom HTML tag in Google Tag Manager which will load the DoubleClick version of the Google Analytics script and then check to see if it loaded. If it’s loaded, then we’ll push a ‘success’ event to the data layer. If it fails, we’ll push a ‘failed’ event to the data layer. We’ll then add another Google Analytics tag which will fire the google-analytics.com version of the script when a success or failed event is pushed to the data layer. The beauty of this is that we’re recording this event via the google-analytics.com version of the script, so our baseline is users that we know we can track. Users that we record a ‘failed’ event for are the users we’ll no longer be able to track.
Here we go:
- Log into Google Tag Manager
- Select the appropriate tag container for the site(s) you want to test
- Create a new custom HTML tag with the contents shown below:
<script> (function() { var ga = document.createElement('script'); ga.type = 'text/javascript'; ga.async = true; ga.src = ('https:' == document.location.protocol ? 'https://' : 'http://') + 'stats.g.doubleclick.net/dc.js'; var s = document.getElementsByTagName('script')[0]; s.parentNode.insertBefore(ga, s); setTimeout(function(){ if (typeof _gat == 'undefined') { //Record an event in GA via data layer dataLayer.push({ 'event':'doubleclickTest', 'scriptLoad':'failed'}); } else { dataLayer.push({ 'event':'doubleclickTest', 'scriptLoad':'success'}); } }, 1000); })(); </script> - Add a firing rule that fires on the home page of your site (e.g., url equals http://www.yoursite.com/)
- Add a Google Analytics tag
- Enter a descriptive name (I used ‘GA Monitor DoubleClick Load’)
- Enter your Web Property ID
- Set the Track Type to Event
- Set a Category of ‘DoubleclickTest’
- Click the ‘Add Macro’ button to the right of Action.
- Create a new Macro named ‘Script Load’
- Set the type to Data Layer Variable
- Set the Data Layer Variable Name to ‘scriptLoad’
- Click Save
- Verify the Action is now set to ‘{{scriptLoad}}’
- Click Add Rule to Fire Tag
- Enter a descriptive name (I used ‘Event equals doubleclickTest’)
- Under conditions, set {{event}} equals doubleclickTest
- Click Save
- Verify your new rule is under the ‘Firing Rules’ heading.
- (Updated 11/25/2013): Be sure to set the non-interaction flag to ‘TRUE’ otherwise you will have a pageview and an event for every visitor which will reduce your bounce rate to 0%. Thanks to @AnalyticsNinja for catching this.
- You should see something like this:

- Click Save to save this tag
- Create a new version of your tag container
- Publish!
- Run the test until you have at least a week’s worth of data.
- In Google Analytics, create a custom report as follows:
- Metric = Unique Visitors
- Dimension = Event Action
- Filter: Include Event Category Exact DoubleclickTest
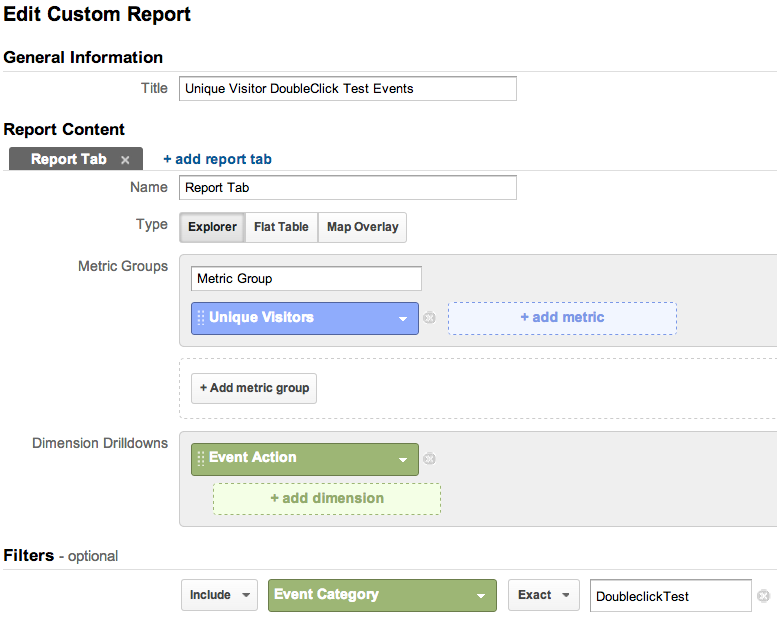
- Run the report, switch to the percentage view (pie chart icon on right) and you’ll see what percentage of unique visitors you’ll lose by switching to the Doubleclick version of Google Analytics.
Augh!@#$!#$! I’m losing xx.xx% of users? What do I do?
 It’s up to you. If you’re willing to forego the lost visitor data, then do it and reap the benefits of the DoubleClick insights and remarketing. However, if you aren’t OK with this, you do still have options. Since we can measure the amount of lost user data with the test above, we can use the same logic to inject the older google-analytics.com version of the Google Analytics script when the DoubleClick version of the script fails to load. This, again, will require the use of a Custom HTML tag in Google Tag Manager that would look something like this:
<script>
var _gaq = _gaq || [];
_gaq.push(['_setAccount', 'UA-XXXXXX-XX']); //Change your Profile ID here or map it to a Macro
_gaq.push(['_trackPageview']);
(function() {
  var ga = document.createElement('script');
  ga.type = 'text/javascript';
  ga.async = true;
  ga.src = ('https:' == document.location.protocol ? 'https://' : 'http://') + 'stats.g.doubleclick.net/dc.js';
  var s = document.getElementsByTagName('script')[0]; s.parentNode.insertBefore(ga, s);

setTimeout(function(){
  if (typeof _gat == 'undefined') {
    //DoubleClick script failed to load, load google-analytics.com version
    var ga2 = document.createElement('script');
    ga2.type = 'text/javascript';
    ga2.async = true;
    ga2.src = ('https:' == document.location.protocol ? 'https://ssl' : 'http://www') + '.google-analytics.com/ga.js';
    var s2 = document.getElementsByTagName('script')[0]; s2.parentNode.insertBefore(ga2, s2);
  }
}, 1000);
})();
</script>
Updated 11/25/2013:
@AnalyticsNinja had a great suggestion on how you can avoid having to use a Custom HTML script to fire Google Analytics. Instead, you would create two versions of the Google Analytics tags. One would use the google-analytics.com version of the script and the other one would use the Display Advertising (doubleclick.net) version of the script. You would then fire the appropriate script based on whether or not you were able to successfully load the DoubleClick version of the script. You might do something like this in your custom HTML DoubleClick test script:
<script>
(function() {
  var ga = document.createElement('script');
  ga.type = 'text/javascript';
  ga.async = true;
  ga.src = ('https:' == document.location.protocol ? 'https://' : 'http://') + 'stats.g.doubleclick.net/dc.js';
  var s = document.getElementsByTagName('script')[0]; s.parentNode.insertBefore(ga, s);

  setTimeout(function(){
    if (typeof _gat == 'undefined') {
      dataLayer.push({
        'event':'doubleclickTest',
        'useScript':'googleAnalytics'});
    } else {
      dataLayer.push({
        'event':'doubleclickTest',
        'useScript':'doubleclick'});
    }
  }, 1000);
})();
</script>
Based on the above, you would then add a macro value for ‘useScript’ and rules that fired the google-analytics.com script when useScript equals googleAnalytics, and the DoubleClick version when useScript equals doubleclick.
I hope this article helps some of you decide whether to make the jump to DoubleClick’s Google Analytics tag. If you’re having difficulties implementing this, please get in touch with me on here or Google+.
Happy measuring!
Additional Resources
- A simpler way to re-connect with your visitors (Google Analytics Blogspot)
- Doubleclick Remarketing and AdBlock: Our Solution to the dc.js Traffic Drop (Loves Data)
- Use of Ad Blocking is on the rise (Forbes)


